Zucchini-Lentil Fritters with Lemony Yogurt

Photo of vegetable pancake from Max Griss from Unsplash

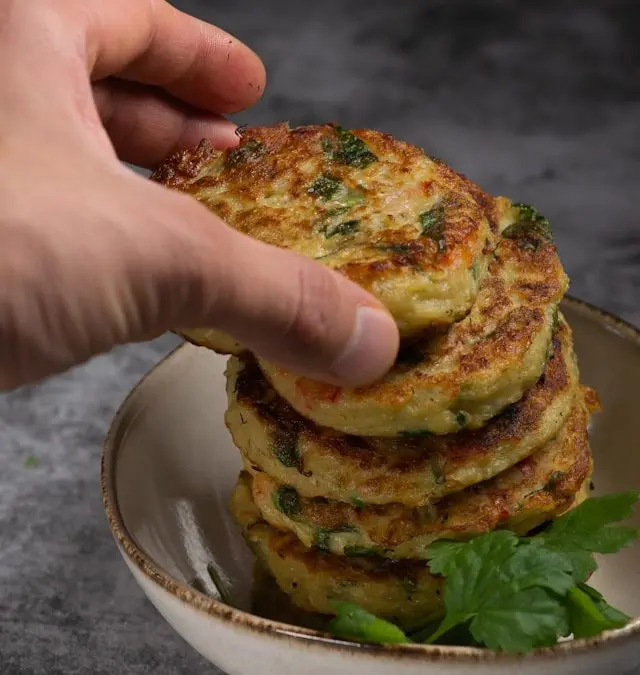
Savor the zest of our zucchini-lentil fritters paired with lemony yogurt, a burst of flavors in each bite. Crisp on the outside and tender within, these fritters combine zucchini and lentils to perfection. Topped with refreshing lemony yogurt, they make a satisfying meal or appetizer that’s both wholesome and delicious.

Photo of vegetable pancake from Max Griss from Unsplash

Zucchini-Lentil Fritters with Lemony Yogurt

Sohla El-Waylly
Savor the crispy perfection of Zucchini Lentil Fritters paired with a zesty Lemony Yogurt dip, where wholesome lentils and shredded zucchini are transformed into golden patties bursting with flavor. This delightful dish offers a satisfying crunch and a burst of freshness, making it a delightful addition to any meal or gathering.
Course Appetizer
Servings 4 servings

Ingredients
  

Lemony Yogurt

  • 3/4 cup whole-milk yogurt
  • 2 Tbsp fresh lemon juice
  • 1/2 tsp sugar
  • Kosher salt

Fritters

  • 1 cup red lentils (masoor dal)
  • 1 medium zucchini about 5 oz
  • 1/2 medium onion thinly sliced
  • 1.75 tsp kosher salt divided, plus more
  • 1/2 tsp Kashmiri chile powder or 1/4 tsp cayenne pepper
  • 1/4 tsp ground turmeric
  • 1 cup parsley leaves with tender stems
  • 1 Tbsp finely grated lemon zest
  • 1 cup ghee or vegetable soil

Instructions
 

  • Prepare the yogurt. Whisk together yogurt, lemon juice, and sugar in a small bowl to combine. Season with salt.
  • Rinse lentils, then soak in 2 cups of water at room temperature at least 1 hour and up to 12 hours (soaking lentils makes them tender and a lot easier to blend).
  • Meanwhile, trim ends from zucchini and cut crosswise into 3 pieces about 2" long. Cut each piece lengthwise into 1/4"-thick planks. Stack a few planks and slice lengthwise into 1/4"-thick matchsticks (about the size of a skinny french fry).
  • Transfer zucchini to a colander set in a medium bowl. Add onion and 1 tsp salt and toss to combine. Let sit until vegetables look wilted and softened and about 1 Tbsp liquid has released into bowl, 30 minutes to 2 hours. Gently pay dry with paper towels to remove any excess moisture.
  • Drain lentils and transfer to a food processor. Add chile powder, turmeric, and 3/4 tsp salt. Pulse, scraping bowl sides, until a purée forms. Transfer to a medium bowl and add zucchini and onion, parsley, and lemon zest. Toss with a rubber spatula to combine.
  • Line a rimmed baking sheet with paper towels; set a wire rack inside. Heat ghee in a medium cast-iron skillet over medium-high until a pinch of batter added to pan sizzles and sputters.
  • Using a large spoon, scoop out about 1/4 cup batter, then use a second large spoon dipped in the hot ghee to carefully scrape into pan; flatten with ghee-coated spoon. Repeat for 3 more fritters. Fry until deep golden brown on the first side, about 3 minutes. Turn over with a wide slotted spatula and fry until deep golden brown underneath, about 3 minutes.
  • Transfer fritters to prepared rack to drain; season with salt. Repeat with remaining batter (you end up with 8-10 fritters total).
  • Transfer fritters to a platter and serve with lemony yogurt alongside.

Notes

Note: Yogurt can be made 1 day ahead. Cover and chill.
This recipe is by Sohla El-Waylly for Bon Appetit.
This favorite recipe was contributed by a Backyard Eats client! She encourages home cooks to substitute ingredients as needed based their lifestyle or what's growing fresh in their garden.

Leeks Vinaigrette

Photo of harvested and trimmed leeks from Lucy May from Unsplash

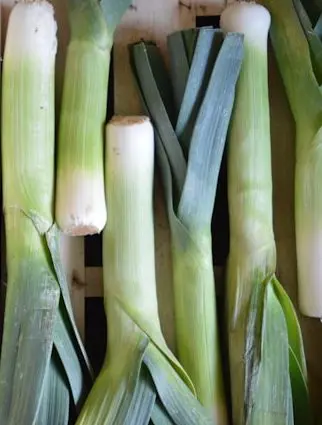
Enjoy the simplicity of our leeks vinaigrette, a dish that celebrates fresh flavors in every bite. Tender leeks are lightly cooked and dressed in a tangy vinaigrette, creating a delightful balance of sweetness and acidity. Perfect as a refreshing side or a light appetizer, it’s a culinary delight that’s both satisfying and invigorating.

Photo of harvested and trimmed leeks from Lucy May from Unsplash

Leeks VInaigrette

Cooks Illustrated
Enjoy the simplicity of Leeks Vinaigrette, where tender leeks are gently poached and dressed in a tangy vinaigrette, creating a refreshing and elegant dish. This classic French recipe highlights the delicate sweetness of leeks, balanced perfectly with the bright acidity of the vinaigrette, making it a perfect addition to any meal.
Total Time 1 hour 15 minutes
Course Side Dish
Servings 4

Ingredients
  

  • 3 leeks (1-1.5" diameter, with 8-9" of white and light green parts) white and light green parts only
  • Table salt for simmering leeks
  • 2 tsp + 3 Tbsp extra-virgin olive oil divided
  • 3/4 cup fresh bread crumbs
  • 2 Tbsp finely grated Parmesan cheese
  • 2 Tbsp finely chopped fresh parsley divided
  • 1/4 tsp pepper
  • 1.5 Tbsp red wine vinegar
  • 1 Tbsp Dijon mustard
  • 1 garlic clove minced to paste

Instructions
 

  • Trim roots from leeks, leaving base intact so layers stay together. Starting 1 inch above base, halve leeks lengthwise (they'll still be joined at base). Rinse thoroughly between layers to remove any dirt. Tie halves of each leeks together with kitchen twine about 2" from top.
  • Bring 3 quarts of water to boil in Dutch oven. Add leeks and 3 Tbsp salt and return to boil. Adjust heat to maintain simmer. Cover and cook until area just above base can be pierced easily with paring knife, 15-20 minutes.
  • Using tongs, grasp 1 leek close to base and hold vertically over pot to drain briefly. Transfer to paper towel-lined plate and repeat with remaining leeks. Let sit until cool enough to handle, about 10 minutes. While leeks cool, make crumbs and vinaigrette.
  • Heat 2 Tbsp oil in 8" non-stick skillet over medium heat until shimmering. Add bread crumbs and cook over medium heat, stirring frequently, until deep golden brown, 4-5 minutes. Off heat, sprinkle with Parmesan and let sit until crumbs are just warm, about 5 minutes. Add 1 Tbsp parsley and pepper and stir, breaking up any clumps.
  • Whisk vinegar, mustard, 1 Tbsp water, and garlic together in small bowl until combined. Whisking constantly, drizzle in remaining 3 Tbsp oil. Whisk remaining 1 Tbsp parsley.
  • Squeeze leeks over sink to remove excess water. Remove twine and finish cutting leeks in half lengthwise. Cut each half crosswise into thirds (do not remove bases or leeks; they're delicious). Spread half of vinaigrette over bottom of serving platter. Arrange leeks on platter, cut side up, opening layers slightly. Drizzle evenly with remaining vinaigrette. Sprinkle with breadcrumb mixture and serve.

Notes

Note: Dressed leeks can be covered loosely and stored at room temperature for up to 3 hours.
This recipe was published in Cooks Illustrated.
This favorite recipe was contributed by a Backyard Eats client! She encourages home cooks to substitute ingredients as needed based their lifestyle or what's growing fresh in their garden.

Spinach and Feta Borek

Photo of baked dish being pulled from oven

Experience the savory delight of our spinach and feta borek, a timeless Mediterranean treat. Layers of delicate phyllo pastry encase a flavorful filling of spinach and creamy feta cheese, creating a harmonious blend of textures and tastes. With each bite, savor the richness of the cheese and the earthy freshness of the spinach, making this dish a true delight for the senses. Whether enjoyed as a hearty appetizer or a satisfying main course, our borek is sure to transport you to the sun-kissed shores of the Mediterranean with its delicious flavors.

Photo of baked dish being pulled from oven

Spinach and Feta Borek

David Tanis
Indulge in the savory delight of spinach and feta borek, a traditional Turkish pastry featuring layers of flaky phyllo dough filled with a sumptuous blend of spinach, tangy feta cheese, and fragrant herbs, perfect for adding a Mediterranean twist to your springtime gatherings. This crispy, golden pastry offers a delightful fusion of flavors and textures, making it a deliciously satisfying addition to any seasonal spread.
Prep Time 15 minutes
Cook Time 30 minutes
Course Side Dish
Servings 8 servings

Ingredients
  

  • 1 lb baby spinach or other cooking greens sliced into 1/2" ribbons
  • 1 cup chopped parsley (from 1 small bunch)
  • 1 cup chopped fresh dill (from 1 small bunch)
  • 6 scallions, thinly sliced (about 3/4 cup)
  • 1 tsp dried oregano
  • 4 eggs beaten
  • Kosher salt and black pepper
  • 1/2 tsp Maras pepper or regular red pepper flakes
  • 8 oz crumbled feta (about 2 cups)
  • 4 oz grated Manchego or other sheep's milk cheese (1 cup)
  • 1/2 cup extra-virgin olive oil plus more as needed
  • 6 sheets phyllo dough

Instructions
 

  • Heat oven to 350° F. Make the filling: in a large bowl, combine spinach, parsley, dill, scallions, oregano and eggs and stir to incorporate. Season with salt and pepper, then add Maras pepper, feta and Manchego, and stir well.
  • Brush a 10-inch pie plate or skillet lightly with olive oil. (You can also use a 9x13" pan for a rectangular pie.) Line with 1 sheet of phyllo, letting the excess fall over the sides of the pan. Brush phyllo lightly with olive oil, then follow with 2 more sheets, brushing each with oil.
  • Pour the filling into the phyllo-lined pan, spreading it to the edges with the back of a spoon. Top with 3 more sheets of phyllo, brushing each sheet with olive oil before adding the next.
  • Fold the ends of the phyllo back over the top and towards the center of the borek, and brush with oil. With the palm of your hand, press down on the top layer to make the pie compact. (Alternatively, roll the excess toward the center to form a rim.)
  • Bake for 30 minutes, until golden. Let rest for a few minutes before cutting into wedges. The borek is also good served at room temperature.

Notes

This recipe was originally published by David Tanis for the NYT cooking blog.
This favorite recipe was contributed by a Backyard Eats client! She encourages home cooks to substitute ingredients as needed based their lifestyle or what's growing fresh in their garden.

Minty Pea Soup

Photo of soup from Megan Bucknall from Unsplash

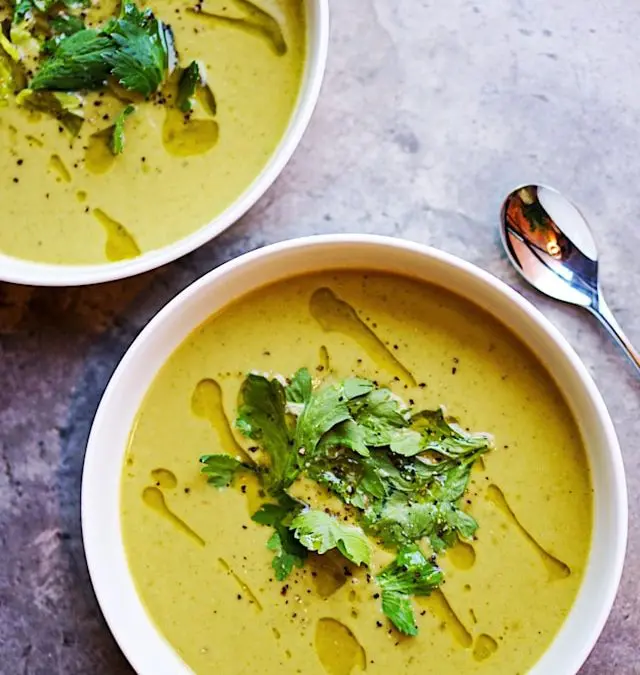
Indulge in the refreshing flavors of our minty pea soup, a perfect blend of vibrant green peas and aromatic mint. Each spoonful is a celebration of spring’s bounty, with the sweetness of peas perfectly complemented by the cool freshness of mint. Whether enjoyed as a light starter or a comforting meal, this soup offers a delightful burst of flavor that will leave you feeling nourished and invigorated.

Photo of soup from Megan Bucknall from Unsplash

Minty Pea Soup

Bon Appetit
Elevate your springtime menu with a refreshing Minty Pea Soup, a vibrant blend of tender peas and fresh mint, delicately seasoned to perfection. This light and flavorful soup offers a burst of green goodness, perfect for welcoming the season's bounty with every spoonful.
Course Soup

Ingredients
  

  • 3 Tbsp unsalted butter
  • 1 medium onion chopped
  • 4 cups low-sodium vegetable broth divided
  • 6 cups shelled fresh peas (from about 6 lb pods) or frozen peas, thawed
  • 1/4 cup fresh flat-leaf parsley leaves
  • 1/4 cup fresh mint leaves
  • Kosher salt and freshly ground black pepper
  • 1/4 cup creme fraiche or sour cream
  • 2 Tbsp heavy cream or water
  • Chopped fresh chives for serving

Instructions
 

  • Melt butter in a large heavy pot over medium heat. Add onion and cook, stirring often, until softened but not browned. 6-8 minutes.
  • Add 2 cups broth and bring to a boil. Add peas, reduce heat, and simmer gently until tender, about 5 minutes for fresh peas, about 2 minutes for frozen.
  • Remove pot from heat. Add parsley, mint, and remaining 2 cups broth to pot. Purée soup in a blender or with an immersion blender, thinning with water if soup is too thick, until smooth. Season soup with salt and pepper.
  • Whisk creme fraiche and cream in a small bowl to blend. Serve warm soup topped with chives, passing creme fraiche mixture alongside for spooning over.

Notes

This recipe was originally published in the April 2013 issue of Bon Appetit.
This favorite recipe was contributed by a Backyard Eats client! She encourages home cooks to substitute ingredients as needed based their lifestyle or what's growing fresh in their garden.

Acorn Squash with Sausage Bread Stuffing

Photo of acorn squash by Kim Daniels from Unsplash

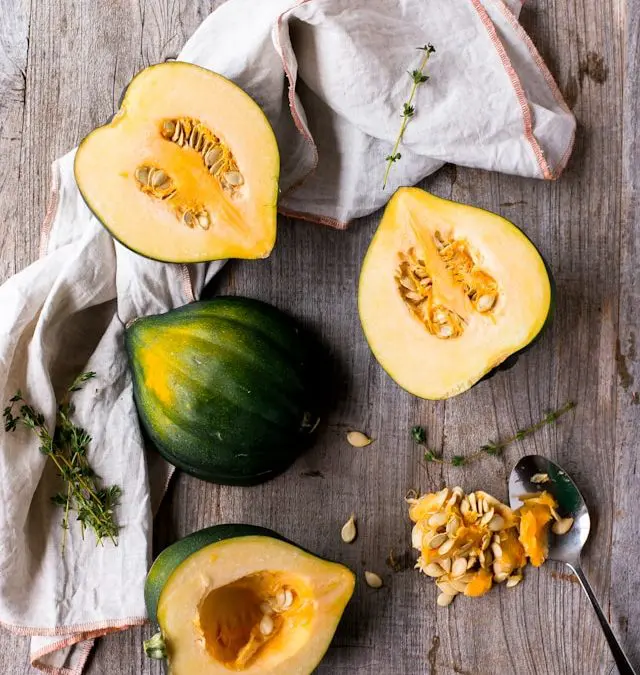
Indulge in the flavors of fall with our savory acorn squash filled with sausage bread stuffing. This hearty dish features tender roasted squash, a vegetable emblematic of autumn. Stuffed with a flavorful mixture of savory sausage and hearty bread, it’s a delicious combination that embodies the comfort of the season. Whether served as a festive centerpiece or a cozy weeknight dinner, our stuffed squash brings the warmth and richness of fall flavors to your table, making every bite a celebration of the harvest season.

Photo of acorn squash by Kim Daniels from Unsplash

Acorn Squash with Sausage Bread Stuffing

NY Times Magazine
Savor the essence of fall with acorn squash filled to perfection, embracing a hearty stuffing of savory sausage and bread. A symphony of flavors from your kitchen garden.
Prep Time 25 minutes
Cook Time 45 minutes
Total Time 1 hour 10 minutes
Course Main Course
Servings 6 servings

Ingredients
  

  • 3 large acorn squash (halved crosswise, seeds and fibers scooped out)
  • 1 tsp unsalted butter
  • 1 medium onion, peeled and chopped
  • 12 oz breakfast-style pork sausage
  • 2 tsp dried thyme
  • 1/2 tsp salt
  • Freshly ground black pepper (to taste)
  • 1/2 cup toasted pecan halves
  • 4 cups of 1/4 inch cubes of lightly toasted sourdough bread
  • 3/4 cup chicken broth (homemade or low-sodium canned)
  • 4 tsp chopped fresh Italian parsley

Instructions
 

  • Slice off the bottom of each squash half so that they stand flat, being careful to not cut into the flesh. Place in a large roasting pan and set aside.
  • Melt the butter in a large nonstick skillet over medium heat. Add the onion and cook until softened, about 5 minutes.
  • Add the sausage and cook, breaking it up with the back of a spoon, until no traces of pink remain (about 8 minutes).
  • Transfer the mixture to a large bowl and stir in the thyme, salt, pepper, pecans, bread cubes and chicken broth until well mixed.
  • Divide the stuffing mixture among the squash halves. Add enough water to the roasting pan to make a depth of about 1/4 inch. Cover the squash loosely with foil and roast until the squash is tender (about 45 minutes).
  • Place 1 squash half on each of the 6 plates, garnish with parsley and serve immediately.

Notes

This recipe was published in the November 16, 1994 edition of NY Times Magazine. (pp 71-72)
This favorite recipe was contributed by a Backyard Eats client! She encourages home cooks to substitute ingredients as needed based their lifestyle or what's growing fresh in their garden.

Butternut Squash Soup

Photo of squash soup from Valeria Boltneva from Unsplash

Whipping up a batch of homemade butternut squash soup is a straightforward and deeply satisfying experience. This method ensures that the natural sweetness and nuttiness of the squash shine through, resulting in a comforting, creamy soup that’s perfect for fall. Yet, it’s not just about the flavors; butternut squash soup is also a nutritional powerhouse, packed with vitamins, fiber, and antioxidants that can support your well-being. So, indulge in the simplicity of creating this classic soup and savor its nourishing goodness.

Photo of squash soup from Valeria Boltneva from Unsplash

Butternut Squash Soup

Love & Lemons
The natural sweetness and nuttiness of the squash shine through, resulting in a comforting, creamy soup that's perfect for fall.
Prep Time 10 minutes
Cook Time 35 minutes
Total Time 45 minutes
Course Soup
Servings 6 servings

Equipment

  • 1 5.5-Quart Dutch Oven
  • 1 Blender

Ingredients
  

  • 2 Tbsp extra virgin olive oil
  • 1 large yellow onion, chopped
  • 1/2 tsp sea salt
  • 1 (3 lb) butternut squash (peeled, seeded, and cubed)
  • 3 cloves garlic, chopped
  • 1 Tbsp fresh sage, chopped
  • 1/2 Tbsp fresh rosemary, minced
  • 1 tsp fresh ginger, grated
  • 3-4 cups vegetable broth
  • Freshly ground black pepper, to taste
  • Chopped parsley, toasted pepitas, and/or crusty bread (for serving)

Instructions
 

  • Heat the oil in a large pot over medium heat. Add the onion, salt, and several grinds of fresh pepper and sauté until soft, 5 to 8 minutes. Add the squash and cook until it begins to soften, stirring occasionally, for 8 to 10 minutes.
  • Add the garlic, sage, rosemary, and ginger. Stir and cook 30 seconds to 1 minute, until fragrant, then add 3 cups of the broth. Bring to a boil, cover, and reduce heat to a simmer. Cook until the squash is tender, 20 to 30 minutes.
  • Let cool slightly and pour the soup into a blender, working in batches if necessary, and blend until smooth. If your soup is too thick, add up to 1 cup more broth and blend. Season to taste and serve with parsley, pepitas, and crusty bread.

Notes

This recipe is originally from the Love and Lemons blog.

Asparagus Risotto

Photo of asparagus risotto from Katrin Morenz from Wikimedia Commons

Asparagus risotto is a creamy and flavorful dish that showcases the vibrant taste of asparagus in a comforting way. With a handful of ingredients and simple cooking techniques, you can create a delightful risotto that is both satisfying and indulgent. The tender asparagus spears, combined with the creamy Arborio rice, create a harmonious blend of textures and flavors. Whether enjoyed as a main course or as a side dish, asparagus risotto offers a delightful balance of earthy asparagus and creamy rice, resulting in a luxurious dish that will please your taste buds. Embrace the process of making this risotto and savor its deliciousness with every luscious spoonful.

Photo of asparagus risotto from Katrin Morenz from Wikimedia Commons

Asparagus Risotto

Love and Lemons
Asparagus risotto offers a delightful balance of earthy asparagus and creamy rice, resulting in a luxurious dish that will please your taste buds.
Prep Time 10 minutes
Cook Time 28 minutes
Total Time 38 minutes
Course Main Course, Side Dish
Servings 4 servings

Ingredients
  

  • 1 Tbsp extra-virgin olive oil
  • 2 cups chopped leeks
  • 1/2 tsp sea salt (or to taste)
  • 2 cloves garlic (minced)
  • 1 cup uncooked Arborio rice (rinsed)
  • 1/2 cup dry white wine
  • 4 cups vegetable broth (room temperature)
  • 1 bunch asparagus (tough ends trimmed, stalks chopped into small pieces)
  • 1 Tbsp fresh lemon juice
  • 2 Tbsp chopped chives
  • 1/4 cup fresh herbs (parsley, basil, tarragon, and/or dill, plus more for garnish)
  • Lemon zest (for garnish)
  • Grated pecorino cheese (optional)
  • Freshly ground black pepper (for garnish)

Instructions
 

  • Heat the olive oil in a large skillet or medium Dutch oven over medium heat. Add the leeks and season with the salt and a few grinds of pepper. Cook, stirring occasionally, for 4 to 5 minutes, or until soft. Add the garlic and stir to incorporate. Stir in the rice and let it cook for 1 minute. Stir in the wine and cook for another 1 to 2 minutes, or until the wine cooks down.
  • Add the broth, ¾ cup at a time, stirring continuously between each addition. Allow each addition of broth to be absorbed by the rice before adding the next. Add the asparagus with the last addition of the broth. Cook until the rice is al dente. The risotto should be soft and creamy.
  • Add the lemon juice, chives, and mixed herbs and season to taste. Garnish with the lemon zest and more herbs. Serve with grated cheese, if desired.

Notes

This recipe came from the Love and Lemons blog.

French Potato Salad

Photo of roasted potatoes from Nadin from Pexels

French potato salad with tarragon is a flavorful and classic dish that combines the creamy goodness of potatoes with the aromatic touch of tarragon. With minimal ingredients and simple preparation, you can create a delightful salad that is both comforting and satisfying. The tender boiled potatoes, tossed with a tangy vinaigrette and fresh tarragon, create a harmonious blend of flavors. Whether enjoyed as a side dish or a light lunch, French potato salad with tarragon offers a delightful balance of tastes and textures. Embrace the simplicity of making this salad and savor its deliciousness with every delectable bite.

Photo of roasted potatoes from Nadin from Pexels

French Potato Salad

Taste of Home
French potato salad with tarragon is a flavorful and classic dish that combines the creamy goodness of potatoes with the aromatic touch of tarragon.
Prep Time 10 minutes
Cook Time 15 minutes
Course Side Dish
Servings 6 cups

Ingredients
  

  • 1 lb baby red potatoes
  • 1 lb baby yellow potatoes
  • 1 clove garlic
  • 1/4 cup olive oil
  • 2 Tbsp white wine or champagne vinegar
  • 2 tsp Dijon mustard
  • 1/2 tsp salt
  • 1/2 tsp pepper
  • 1 shallot (finely chopped)
  • 1 Tbsp each mixed fresh chervil, parsley, and chives
  • 1 tsp minced fresh tarragon

Instructions
 

  • Place potatoes in a large saucepan; add water to cover. Bring to a boil. Reduce heat; cook, uncovered, 10-15 minutes or until tender. With a slotted spoon, remove potatoes to a colander; cool slightly. Return water to a boil. Add garlic; cook, uncovered, 1 minute. Remove garlic and immediately drop into ice water. Drain and pat dry; mince. Reserve 1/4 cup cooking liquid.
  • Cut cooled potatoes into 1/4-inch slices. Transfer potatoes to a large bowl. In a small bowl, whisk reserved cooking liquid, oil, vinegar, mustard, minced garlic, salt and pepper until blended. Pour over potato mixture; toss gently to coat. Gently stir in remaining ingredients. Serve warm or at room temperature.

Notes

If you don't have chervil, you may substitute extra parsley and/or tarragon.
This recipe came from the Taste of Home blog.

White Bean and Turnip Salad with Roasted Garlic Scapes

Photo of lima beans from Marina Leonova from Pexels

White bean and turnip salad with roasted garlic scapes is a refreshing and flavorful dish that combines the creaminess of white beans, the crispness of turnips, and the unique taste of roasted garlic scapes. With a handful of ingredients and simple assembly, you can create a delightful salad that is both satisfying and vibrant. The creamy white beans, crunchy turnips, and charred garlic scapes come together in a harmonious blend of textures and flavors. Whether enjoyed as a refreshing side dish or a light lunch, this salad offers a delightful balance of tastes that will tantalize your taste buds.

Photo of lima beans from Marina Leonova from Pexels

White Bean and Turnip Salad with Roasted Garlic Scapes

Valerie from Very Vegan Val
White bean and turnip salad with roasted garlic scapes is a refreshing and flavorful dish that combines the creaminess of white beans, the crispness of turnips, and the unique taste of roasted garlic scapes.
Course Salad

Ingredients
  

  • 6 Hakurei turnips
  • 12 garlic scapes
  • 1.5 cups white beans (about 1 can)
  • 1/2 cup baby arugula
  • 1/4 cup finely chopped parsley
  • 1/4 cup slivered almonds
  • 1 lemon (juice of)
  • 1 Tbsp olive oil
  • 1 tsp chopped fresh thyme
  • Salt and pepper (to taste)

Instructions
 

  • Preheat the oven to 375°F (190°C). Place the garlic scapes on a baking sheet anddrizzle with olive oil and season with salt and pepper.
  • Bake for 10 minutes, flip, and bake for another 10-15 minutes.
  • Let your roasted garlic scapes cool for a coupleminutes until they can be handled, and chop off any parts that have become overlycrispy.
  • Cut the remaining scapes into pieces, and place them in a bowl. Add the beans,drained and rinsed if using canned. Add the arugula, chopped a little if the leavesare larger, parsley, almonds, lemon juice, olive oil, and fresh thyme. Toss, and serveright away or chill until serving

Notes

This recipe came from the Very Vegan Val blog.

Stuffed Zucchini Blossoms

Photo of zucchini blossoms from Paul Asman and Jill Lenoble from Wikimedia Commons

Stuffed zucchini blossoms are a delicate and delightful appetizer that celebrates the beauty of zucchini flowers. With minimal ingredients and careful preparation, you can create a culinary masterpiece that combines the subtle sweetness of the blossoms with a flavorful filling. The delicate flowers are carefully stuffed with a mixture of cheese, herbs, or other delicious fillings, and then lightly battered and fried to crispy perfection. Whether enjoyed as an elegant appetizer or a unique addition to a meal, stuffed zucchini blossoms offer a delightful blend of textures and flavors. Embrace the artistry of preparing these edible blooms and savor the exquisite taste with each delightful bite.

Photo of zucchini blossoms from Paul Asman and Jill Lenoble from Wikimedia Commons

Stuffed Zucchini Blossoms

Chef Dennis Littley
Stuffed zucchini blossoms are a delicate and delightful appetizer that celebrates the beauty of zucchini flowers.
Prep Time 10 minutes
Cook Time 10 minutes
Course Appetizer
Servings 12 blossoms

Ingredients
  

Stuffed Zucchini Blossoms

  • 12-15 zucchini blossoms
  • 1/2 cup ricotta cheese
  • 1 oz Romano cheese (grated)
  • 1 oz Mozzarella cheese (shredded)
  • 1 egg (lightly beaten)
  • sea salt (to taste)
  • black pepper (to taste)
  • A pinch granulated garlic
  • cooking oil (as needed)

Egg Batter

  • 2 whole eggs
  • 1/4 cup milk
  • 1/4 cup flour
  • 1/4 cup Romano (grated)
  • 1 Tbsp basil or Italian parsley (chopped)

Instructions
 

Blossom Stuffing

  • Mix all the ingredients together and place in small pastry bag, or a ziplock bag with an end snipped off.
  • Open one end of the blossom gently and squeeze a small amount of cheese into the blossom. Due not overfill, you want enough to almost fill the blossom not to make it bulge.
  • Refrigerate the blossoms for about 10-15 minutes while you get the egg mixture together.

Egg Batter

  • Lightly beat the eggs and add in milk, flour, cheese, and basil. Mix well. Egg mixture should be about pancake mix thickness. If the mix is too thick the egg coating will be to thick and if its too thin it will run off.
  • Heat a large sauté pan and then add about ¼ inch of cooking oil to the pan.
  • Dredge Zucchini blossom in egg mixture, shed any excess egg and place into hot oil, continue the process till you fill the pan.
  • Fry each side of the Blossom until golden brown, about two minutes on each side, the second side may cook faster, keep an eye on them.
  • Place finished blossom on paper towels to drain off any excess oil. Place blossoms on serving tray and season with grated Romano cheese, sea salt and black pepper.

Notes

This recipe is courtesy of Chef Dennis Littley from Ask Chef Dennis.