Vegetarian 5-Bean Soup Mix

Mixed beans

This vegetarian soup mix combines layers of pinto, black, and kidney beans with split peas and northern beans, creating a hearty, colorful blend. Aromatic spices infuse the soup with a warm, savory flavor. Beautifully packaged in Mason jars, it’s a nourishing, ready-to-cook gift. Just add tomatoes and water to enjoy a flavorful, homemade soup perfect for cozy, comforting meals.

Mixed beans

Vegetarian 5-Bean Soup Mix

P. Allen Smith
Just add tomatoes and water to enjoy a flavorful, homemade soup perfect for cozy, comforting meals.
Prep Time 1 hour
Cook Time 2 hours
Total Time 3 hours
Course Soup

Ingredients
  

  • 1 lb pinto beans
  • 1 lb split green peas
  • 1 lb great northern beans
  • 1 lb black beans
  • 1 lb kidney beans
  • 1 Tbsp black pepper
  • 1 Tbsp paprika
  • 1 Tbsp dry mustard
  • 2 Tbsp dehydrated onion or 1 fresh onion, diced
  • 2 Tbsp sea salt
  • 2 Tbsp garlic powder
  • 2 Tbsp dried oregano
  • 1 tsp dried rosemary
  • 8 bay leaves
  • 4 vegetable bouillon cubes (or 6 cups broth)
  • 1 14 oz can diced tomatoes

Instructions
 

  • Rinse beans and place in large stockpot, cover in 1 inch of water. Bring to a boil over high heat, cover, remove from heat and let soak for one hour. Drain and rinse.
  • Return beans to the pot and add in spice envelope, one 14-ounce can of diced tomatoes and 6 cups of water. 
  • Bring to a boil, reduce heat and simmer for two hours until beans are tender and soup is thick. Remove bay leaves before serving.

Notes

This recipe was originally published on the HGTV website.
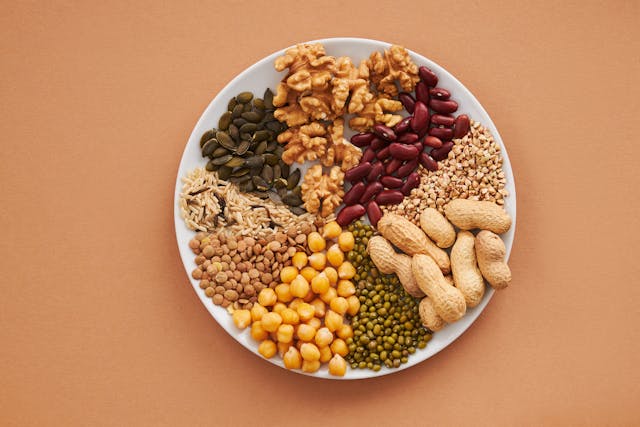
Photo by Vanessa Loring on Pexels.

Rosemary Butternut Bisque

Photo of squash soup from Valeria Boltneva from Unsplash

Embrace the flavors of your garden in every spoonful of our rosemary butternut bisque. This velvety soup celebrates the essence of autumn with roasted butternut squash and fragrant rosemary straight from your garden. Each bite delivers a harmonious blend of sweet squash and aromatic herbs, offering a taste of the season at its finest. Perfect for a cozy meal or a starter at your table, our bisque brings the pure essence of your garden’s bounty to every bowl.

Photo of squash soup from Cala from Unsplash

Rosemary Butternut Bisque

NY Times Magazine
Indulge in the rich warmth of homemade rosemary butternut bisque, crafted from your garden's bounty. Elevate autumn flavors with this velvety soup, a comforting celebration of seasonal homegrown goodness.
Prep Time 39 minutes
Cook Time 30 minutes
Total Time 1 hour 9 minutes
Course Soup
Servings 4 servings

Ingredients
  

  • 2 medium butternut squash (peeled, seeds and fibers scooped out, cut into 1/2 inch cubes)
  • 6 cups chicken broth (homemade or low-sodium canned)
  • 1 Tbsp fresh chopped rosemary
  • 2 tsp grated orange zest
  • 1 tsp salt
  • Freshly ground black pepper (to taste)
  • 2 Tbsp heavy cream (optional)

Instructions
 

  • Preheat the oven to 375 degrees. Place the squash on a baking sheet and roast until tender, about 25 minutes.
  • Transfer to a large saucepan and add the chicken broth, rosemary and orange zest. Bring to a boil over medium heat.
  • Reduce heat and simmer for 30 minutes.
  • Place the mixture in a food processor and process until smooth. Stir in the salt and pepper.
  • Ladle the soup into bowls and swirl a little of the cream into each bowl if desired. Serve immediately.

Notes

This recipe was published in the November 16, 1994 edition of NY Times Magazine. (pp 71-72)
This favorite recipe was contributed by a Backyard Eats client! She encourages home cooks to substitute ingredients as needed based their lifestyle or what's growing fresh in their garden.

Prosciutto-Wrapped Mini Peppers

Photo of multicolor peppers from Nick Collins from Pexels

Whipping up prosciutto-wrapped mini peppers is a breeze, yet the flavor and texture payoff is incredible. These bite-sized gems combine the sweet crunch of mini peppers with the savory richness of prosciutto, creating an appetizer that’s as flavorful as it is visually appealing. Plus, these mini peppers are at their peak during the season, ensuring the freshest and most vibrant taste. Embrace the ease of making this delicious dish and savor the incredible seasonal flavors it brings to your table.

Photo of multicolor peppers from Nick Collins from Pexels

Prosciutto-Wrapped Mini Peppers

Eating Well
These bite-sized gems combine the sweet crunch of mini peppers with the savory richness of prosciutto, creating an appetizer that's as flavorful as it is visually appealing.
Prep Time 10 minutes
Cook Time 10 minutes
Total Time 20 minutes
Course Appetizer

Ingredients
  

  • 1/2 cup cream cheese, softened
  • 1 Tbsp fresh rosemary, chopped
  • 6 mini bell peppers, halved lengthwise and seeded
  • 3 oz thinly sliced prosciutto, cut into 12 strips

Instructions
 

  • Preheat oven to 425°F. Line a large rimmed baking sheet with foil.
  • Combine cream cheese and rosemary in a small bowl. Fill each pepper half with some of the cream cheese mixture and wrap a strip of prosciutto around it.
  • Arrange on the prepared baking sheet and bake until heated through, about 10 minutes.

Notes

This recipe is from the Eating Well blog. This recipe originally appeared in the EatingWell Magazine, December 2021.

Butternut Squash Soup

Photo of squash soup from Valeria Boltneva from Unsplash

Whipping up a batch of homemade butternut squash soup is a straightforward and deeply satisfying experience. This method ensures that the natural sweetness and nuttiness of the squash shine through, resulting in a comforting, creamy soup that’s perfect for fall. Yet, it’s not just about the flavors; butternut squash soup is also a nutritional powerhouse, packed with vitamins, fiber, and antioxidants that can support your well-being. So, indulge in the simplicity of creating this classic soup and savor its nourishing goodness.

Photo of squash soup from Valeria Boltneva from Unsplash

Butternut Squash Soup

Love & Lemons
The natural sweetness and nuttiness of the squash shine through, resulting in a comforting, creamy soup that's perfect for fall.
Prep Time 10 minutes
Cook Time 35 minutes
Total Time 45 minutes
Course Soup
Servings 6 servings

Equipment

  • 1 5.5-Quart Dutch Oven
  • 1 Blender

Ingredients
  

  • 2 Tbsp extra virgin olive oil
  • 1 large yellow onion, chopped
  • 1/2 tsp sea salt
  • 1 (3 lb) butternut squash (peeled, seeded, and cubed)
  • 3 cloves garlic, chopped
  • 1 Tbsp fresh sage, chopped
  • 1/2 Tbsp fresh rosemary, minced
  • 1 tsp fresh ginger, grated
  • 3-4 cups vegetable broth
  • Freshly ground black pepper, to taste
  • Chopped parsley, toasted pepitas, and/or crusty bread (for serving)

Instructions
 

  • Heat the oil in a large pot over medium heat. Add the onion, salt, and several grinds of fresh pepper and sauté until soft, 5 to 8 minutes. Add the squash and cook until it begins to soften, stirring occasionally, for 8 to 10 minutes.
  • Add the garlic, sage, rosemary, and ginger. Stir and cook 30 seconds to 1 minute, until fragrant, then add 3 cups of the broth. Bring to a boil, cover, and reduce heat to a simmer. Cook until the squash is tender, 20 to 30 minutes.
  • Let cool slightly and pour the soup into a blender, working in batches if necessary, and blend until smooth. If your soup is too thick, add up to 1 cup more broth and blend. Season to taste and serve with parsley, pepitas, and crusty bread.

Notes

This recipe is originally from the Love and Lemons blog.

Roasted Acorn Squash with Rosemary

Photo of diced roasted squash

Roasted acorn squash with rosemary is a simple, flavorful side dish that combines the sweetness of acorn squash with the aromatic touch of rosemary. The tender squash and fragrant herb create a harmonious flavor profile. Enjoy this delightful and comforting dish as a standalone side or part of your favorite meal.

Photo of diced roasted squash

Roasted Acorn Squash with Rosemary

Alea Millham
Roasted acorn squash with rosemary is a simple, flavorful side dish that combines the sweetness of acorn squash with the aromatic touch of rosemary.
Prep Time 10 minutes
Cook Time 20 minutes
Total Time 30 minutes
Course Side Dish
Servings 6 servings

Ingredients
  

  • 6 cups acorn squash (cubed)
  • 2 Tbsp olive oil
  • 2 tsp rosemary
  • 1 tsp garlic powder
  • 1/2 tsp onion powder
  • 1/4 tsp salt
  • 1/8 tsp coarse ground pepper

Instructions
 

  • Preheat the oven to 475 degrees Fahrenheit.
  • Place acorn squash cubes on a large cookie sheet with raised edges.
  • Drizzle olive oil over the acorn squash. Toss to coat.
  • Sprinkle the rosemary, garlic powder, onion powder, salt, and pepper over the acorn squash. Toss to coat.
  • Spread the acorn squash pieces out evenly over the cookie sheet. Place in the oven and cook for 10 minutes. After 10 minutes, flip the squash pieces over and cook for another 5 - 10 minutes or until the squash is fork-tender.

Notes

This recipe is courtesy o Alea Millham from Premeditated Leftovers.

Butternut Squash, Kale & Gnocchi Skillet

Photo of gnocchi with cheese from Karolina Grabowska from Pexels

This butternut squash, kale, and gnocchi skillet is a comforting and flavorful dish that brings together the earthy sweetness of butternut squash, the hearty goodness of kale, and the pillowy texture of gnocchi. With just a few ingredients and simple steps, you can create a satisfying one-skillet meal that is both nourishing and delicious. The tender butternut squash, wilted kale, and perfectly cooked gnocchi blend harmoniously, offering a balance of flavors and textures. Whether served as a comforting weeknight dinner or a crowd-pleasing side dish, this skillet dish is a delightful way to enjoy the flavors of the season. Embrace the ease of preparation and relish in the delectable combination of ingredients with each comforting bite.

Photo of gnocchi with cheese from Karolina Grabowska from Pexels

Butternut Squash, Sausage, and Kale Gnocchi Skillet

Danae
This butternut squash, kale, and gnocchi skillet is a comforting and flavorful dish that brings together the earthy sweetness of butternut squash, the hearty goodness of kale, and the pillowy texture of gnocchi
Course Main Course
Servings 4 servings

Ingredients
  

  • 2 links Italian turkey sausage (casings removed)
  • 1 Tbsp olive oil
  • 1/2 cup yellow onion (diced)
  • 3 cups butternut squash (peeled and cubed into 1/2" cubes)
  • 1 clove garlic (grated or minced)
  • 1 tsp fresh rosemary (chopped)
  • 1/4 tsp ground nutmeg
  • 1/4 tsp red pepper flakes (optional)
  • 16 oz gnocchi
  • 4 cups chopped kale (can substitute spinach)
  • 1.25 cups low-sodium chicken broth
  • 1/2 cup part-skim mozzarella cheese (shredded)

Instructions
 

  • Over medium-high heat, spray a skillet with cooking oil or drizzle in about a teaspoon. Squeeze the sausage out of the casing and into the skillet. Use a potato masher or wooden spoon to crumble the sausage. Once the sausage is cooked through remove it from the skillet and onto a plate lined with paper towels to soak up any excess grease.
  • Add a tablespoon olive oil to the skillet along with the diced onion and cubed butternut squash. Season with salt and pepper. Cook the vegetables over medium heat stirring frequently.
  • When the squash is tender, approximately 8-10 minutes, add garlic, rosemary, nutmeg, and red pepper flakes. Cook another minute and then pour in the chicken broth. Scrape up any of the brown bits from the bottom of the skillet then stir in the gnocchi and kale.
  • Cover the skillet with a lid and simmer over medium-low heat until the gnocchi is tender, about 5 minutes. Remove the lid and stir in the sausage. Taste for seasoning. Sprinkle the mozzarella over the top of everything and cover with the lid again. Cook for a couple more minutes or until the cheese is melted. Serve immediately.

Notes

This recipe is courtesy of Danae at Recipe Runner.

Salt Herbs

Photo of garlic bulbs and salt from Jess Loiterton from Pexels


Salt herbs are a versatile and rewarding seasoning that adds a burst of flavor to any dish. With a simple blend of dried herbs and salt, you can create a fragrant and savory mixture that enhances the taste of your favorite foods. The herbs infuse the salt with their aromatic notes, elevating the overall flavor profile. Whether sprinkled on grilled meats, roasted vegetables, or even used as a finishing touch on homemade bread, salt herbs bring a satisfying depth of taste. Enjoy the ease and satisfaction of making your own flavorful seasoning, taking your culinary creations to new heights with just a pinch of salt herbs.

Salt Herbs

With a simple blend of dried herbs and salt, you can create a fragrant and savory mixture that enhances the taste of your favorite foods.
Course: Ingredient
Author: The Professional Chef Ninth Edition

Materials

  • 1.25 oz salt
  • 4 tsp rosemary leaves
  • 4 tsp thyme leaves
  • 1 tsp black peppercorns
  • 6 bay leaves

Instructions

  • Combing all the ingredients in a clean spice grinder and grind to a medium-fine powder.
  • Put in an air-tight container and let rest for 12 hours before using.

Notes

Salt herbs can be made using any combination of herbs from your garden. Whatever your personal preferences are! They are great to use as a dry rub on meat.

Elderberry Syrup

Photo of dark purple elderberry berries
Making elderberry syrup at home with fresh ingredients is both simple and rewarding. The process involves gathering plump elderberries and simmering them with a few other natural ingredients. The resulting syrup is not only delicious but also packed with potent medicinal benefits. Elderberry has been treasured for centuries due to its immune-boosting properties, making it a perfect addition to your wellness routine. With just a little effort, you can whip up this nourishing syrup in your own kitchen, providing your family with a homemade elixir that is both satisfying and beneficial.


Photo of dark purple elderberry berries

Elderberry Syrup

Amy from Amy's Miscellany
Elderberry has been treasured for centuries due to its immune-boosting properties, making it a perfect addition to your wellness routine.
Prep Time 1 hour 10 minutes
Total Time 1 hour 10 minutes
Course Drinks, Ingredient

Equipment

  • 1 Steam juicer

Ingredients
  

  • 2 lb fresh, ripe elderberries
  • 1 cup honey (or maple syrup or date syrup)
  • 2" piece fresh ginger root (shredded)
  • Optional additions: cinnamon stick, cloves, turmeric root, thyme, sage, rosemary, etc. (get creative by adding any medicinal herb/spice you like!)

Instructions
 

  • Remove stems from fresh elderberries.
  • Place elderberries in the top part of a steam juicer. Steam for 30 minutes until the juice is running freely. Press berries lightly to release as much juice as possible.
  • Draw off the hot juice into a saucepan. You should have about 4 cups of juice. Add ginger (and any additional/optional ingredients except the honey) to the saucepan.
  • Simmer the juice with the ginger at a low temperature for 30 minutes until the juice is reduced to 2 cups. Remove the juice from the heat. Pour the juice through a mesh strainer to remove the ginger/other ingredients.
  • Add 1 cup of honey to the strained, reduced juice and stir well to combine. Pour into prepared sanitized bottle with tight-fitting lid. Label.
  • Keep refrigerated with lid firmly on. Will keep for several weeks in the fridge but also freezes nicely up to 6 months!

Notes

How To Use Elderberry Syrup: Adults can take 1 tablespoon of syrup at the first sign of a virus. Children who are able to have honey (over the age of 1) can take 1 teaspoon at the sign of infection. Take every 3 hours (up to 5 times daily) until symptoms are resolved.
Notes on Elderberries: Raw elderberries can cause stomach discomfort in some people - the problem is in the seeds. You must boil the berries for 30 minutes to remove the poisonous compound.
This recipe is courtesy of Amy from Amy's Miscellany (@amysmiscellany on Instagram)

Quick Pickle Recipe

Pickled cucumbers in a glass jar

“Abundance is not something we acquire. It is something we tune into.”
– Wayne Dyer

I love a good mindset shift – an idea that only requires you to think differently about a problem or something you want, that unlocks your potential in an instant – even if true change takes time. I also love pickles.

That’s what makes this quote from Wayne Dyer perfectly pertinent to quick pickling. Contrary to popular belief, pickling isn’t just for cucumbers! You can turn many vegetables from the spring garden into crisp, tangy snacks such as turnips and radishes. Quick pickles make a fun addition to salads, sandwiches, tacos, and more.

Unlike traditional canning, quick pickles are as fast and easy to make as boiling water and pouring it over a few ingredients in a glass jar. For best results, use the freshest vegetables. Keep reading to learn what herbs and spices you can add to enhance your veggies’ flavor! Soon you’ll have delicious snacks to share with friends and family.


Pickled cucumbers in a glass jar

Quick Pickle Recipe

Founder
Unlike traditional canning, quick pickles are as fast and easy to make as boiling water and pouring it over a few ingredients in a glass jar.
Prep Time 10 minutes
Cook Time 0 minutes
Resting Time 1 day
Total Time 1 day 10 minutes
Course Side Dish, Snack

Equipment

  • 1 quart mason jar (or any heat-proof container that you can pour boiling water into)

Ingredients
  

Pickling Ingredients

  • 1 pound fresh vegetables (sliced)
  • 2 cloves garlic (smashed)
  • 2 tsp whole peppercorns (you can also use coriander and/or mustard seeds)
  • 1-2 sprigs fresh herbs (e.g. thyme, dill, and or/rosemary)

Brine Ingredients

  • 1 cup vinegar (white, apple cider, or rice vinegar)
  • 1 cup water
  • 1 Tbsp kosher salt
  • 1 Tbsp sugar

Instructions
 

  • Wash jar(s) with soap and hot water and let dry.
  • Thinly slice fresh vegetables into bite-sized pieces. Smash 2 cloves of garlic with the flat side of a knife, or the clean heel of your hand.
  • Pack vegetables, garlic, spices, and herbs into a mason jar, leaving at least 1/2” of "breathing room" at the top.
  • Put the brine ingredients in a saucepan over medium heat. Stir to dissolve ingredients, and bring to a boil.
  • Pour the hot brine into the jar(s), still leaving at least 1/2” room at the top.
  • Tap the side of the jar(s) to remove any air bubbles.
  • Let the jar(s) cool to room temperature before refrigerating. Wait 24-48 hours before eating for the best flavor.

Notes

Depending on how carefully these quick pickles are prepared and stored, they may last up to 2 months in the refrigerator. They are not fully preserved, however, and so they cannot be stored unrefrigerated or stored indefinitely.