Salt Herbs

Photo of garlic bulbs and salt from Jess Loiterton from Pexels


Salt herbs are a versatile and rewarding seasoning that adds a burst of flavor to any dish. With a simple blend of dried herbs and salt, you can create a fragrant and savory mixture that enhances the taste of your favorite foods. The herbs infuse the salt with their aromatic notes, elevating the overall flavor profile. Whether sprinkled on grilled meats, roasted vegetables, or even used as a finishing touch on homemade bread, salt herbs bring a satisfying depth of taste. Enjoy the ease and satisfaction of making your own flavorful seasoning, taking your culinary creations to new heights with just a pinch of salt herbs.

Salt Herbs

With a simple blend of dried herbs and salt, you can create a fragrant and savory mixture that enhances the taste of your favorite foods.
Course: Ingredient
Author: The Professional Chef Ninth Edition

Materials

  • 1.25 oz salt
  • 4 tsp rosemary leaves
  • 4 tsp thyme leaves
  • 1 tsp black peppercorns
  • 6 bay leaves

Instructions

  • Combing all the ingredients in a clean spice grinder and grind to a medium-fine powder.
  • Put in an air-tight container and let rest for 12 hours before using.

Notes

Salt herbs can be made using any combination of herbs from your garden. Whatever your personal preferences are! They are great to use as a dry rub on meat.

Potato Leek Soup

Photo of potato soup from Karolina Grabowska from Pexels
Making potato leek soup at home is a rewarding and effortless experience. This classic soup combines tender potatoes with flavorful leeks, resulting in a comforting and nourishing bowl of goodness. With minimal ingredients and simple steps, you can create a hearty and satisfying dish. The creamy texture of the soup, along with the delicate sweetness of leeks, makes it a perfect choice for a cozy meal. Whether enjoyed as a starter or a main course, homemade potato leek soup is a comforting option that will warm your heart and soul. Embrace the ease of preparation and relish the delicious simplicity of this timeless soup.
Photo of potato soup from Karolina Grabowska from Pexels

Potato Leek Soup

Jenn Segal
This classic soup combines tender potatoes with flavorful leeks, resulting in a comforting and nourishing bowl of goodness.
Prep Time 25 minutes
Cook Time 40 minutes
Total Time 1 hour 5 minutes
Course Soup
Servings 6 people

Ingredients
  

  • 3 Tbsp unsalted butter
  • 4 large leeks, white and light green parts only (roughly chopped, about 5 cups)
  • 3 cloves garlic (peeled and smashed)
  • 2 lb Yukon Gold potatoes (peeled and roughly chopped into ½-inch pieces)
  • 7 cups chicken or vegetable broth
  • 2 bay leaves
  • 3 sprigs fresh thyme
  • 1 tsp salt
  • 1/4 tsp ground black pepper
  • 1 cup heavy cream
  • Chives, finely chopped (for serving)

Instructions
 

  • Melt the butter over medium heat in a large soup pot. Add the leeks and garlic and cook, stirring regularly, until soft and wilted, about 10 minutes. Adjust the heat as necessary so as not to brown.
  • Add the potatoes, broth, bay leaves, thyme, salt and pepper to pot and bring to a boil. Cover and turn the heat down to low. Simmer for 15 minutes, or until the potatoes are very soft.
  • Fish out the thyme sprig and bay leaves, then purée the soup with a hand-held immersion blender until smooth. (Alternatively, use a standard blender to purée the soup in batches; see note.)
  •  Add the heavy cream and bring to a simmer. Taste and adjust seasoning with salt and pepper. If soup is too thin, simmer until thickened. If it's too thick, add water or stock to thin it out.
  • Garnish with fresh herbs if desired.

Notes

Note: If using a standard blender to purée the soup: be sure not to fill the jar more than halfway; leave the hole in the lid open and cover loosely with a dishtowel to allow the heat to escape; and pour blended soup into a clean pot.
Freezer-Friendly Instructions: The soup can be frozen, without the cream, for up to 3 months. Defrost the soup in the refrigerator for 12 hours and then reheat it on the stovetop over medium heat until hot. Once heated through, add the cream and bring to a simmer before serving.
This recipe is courtesy of Jenn Segal from Once Upon A Chef.

Fresh Herb Bread

Photo of homemade bread with herbs
Baking fresh herb bread at home is a delightful and fulfilling endeavor. With a handful of aromatic herbs and a simple bread dough, you can create a fragrant and flavorful loaf that will elevate any meal. The process is surprisingly easy, and the result is a crusty exterior with a soft, tender crumb bursting with the essence of fresh herbs. Whether you choose rosemary, thyme, or a combination of your favorite herbs, the aroma that fills your kitchen while baking is simply intoxicating. Indulge in the satisfaction of homemade bread and savor the delectable taste of herbs in every bite.
Photo of homemade bread with herbs

Fresh Herb Bread

New Flavours Bread Machine Recipes
With a handful of aromatic herbs and a simple bread dough, you can create a fragrant and flavorful loaf that will elevate any meal.
Course Side Dish

Ingredients
  

  • 10 Tbsp water (1 cup + 2 Tbsp)
  • 2 Tbsp margarine or butter
  • 3 cups bread flour
  • 1/4 cup fresh parsley (chopped)
  • 1 Tbsp fresh oregano leaves (chopped)
  • 2 tsp fresh sage leaves (chopped)
  • 2 tsp fresh thyme leaves (chopped)
  • 1 tsp fresh basil leaves (chopped)
  • 3 Tbsp dry milk
  • 2 Tbsp sugar
  • 1 tsp salt
  • 1.5 tsp yeast

Instructions
 

  • Place all the ingredients in the bread machine (adding liquids first, followed by the dry ingredients and herbs, and the yeast going in last).
  • lSect the basic white cycle. Use a medium or light crust.
  • It is recommended to use a bread pan with 9 cups or larger for this 1.5 lb loaf.

Elderberry Syrup

Photo of dark purple elderberry berries
Making elderberry syrup at home with fresh ingredients is both simple and rewarding. The process involves gathering plump elderberries and simmering them with a few other natural ingredients. The resulting syrup is not only delicious but also packed with potent medicinal benefits. Elderberry has been treasured for centuries due to its immune-boosting properties, making it a perfect addition to your wellness routine. With just a little effort, you can whip up this nourishing syrup in your own kitchen, providing your family with a homemade elixir that is both satisfying and beneficial.


Photo of dark purple elderberry berries

Elderberry Syrup

Amy from Amy's Miscellany
Elderberry has been treasured for centuries due to its immune-boosting properties, making it a perfect addition to your wellness routine.
Prep Time 1 hour 10 minutes
Total Time 1 hour 10 minutes
Course Drinks, Ingredient

Equipment

  • 1 Steam juicer

Ingredients
  

  • 2 lb fresh, ripe elderberries
  • 1 cup honey (or maple syrup or date syrup)
  • 2" piece fresh ginger root (shredded)
  • Optional additions: cinnamon stick, cloves, turmeric root, thyme, sage, rosemary, etc. (get creative by adding any medicinal herb/spice you like!)

Instructions
 

  • Remove stems from fresh elderberries.
  • Place elderberries in the top part of a steam juicer. Steam for 30 minutes until the juice is running freely. Press berries lightly to release as much juice as possible.
  • Draw off the hot juice into a saucepan. You should have about 4 cups of juice. Add ginger (and any additional/optional ingredients except the honey) to the saucepan.
  • Simmer the juice with the ginger at a low temperature for 30 minutes until the juice is reduced to 2 cups. Remove the juice from the heat. Pour the juice through a mesh strainer to remove the ginger/other ingredients.
  • Add 1 cup of honey to the strained, reduced juice and stir well to combine. Pour into prepared sanitized bottle with tight-fitting lid. Label.
  • Keep refrigerated with lid firmly on. Will keep for several weeks in the fridge but also freezes nicely up to 6 months!

Notes

How To Use Elderberry Syrup: Adults can take 1 tablespoon of syrup at the first sign of a virus. Children who are able to have honey (over the age of 1) can take 1 teaspoon at the sign of infection. Take every 3 hours (up to 5 times daily) until symptoms are resolved.
Notes on Elderberries: Raw elderberries can cause stomach discomfort in some people - the problem is in the seeds. You must boil the berries for 30 minutes to remove the poisonous compound.
This recipe is courtesy of Amy from Amy's Miscellany (@amysmiscellany on Instagram)

Quick Pickle Recipe

Pickled cucumbers in a glass jar

“Abundance is not something we acquire. It is something we tune into.”
– Wayne Dyer

I love a good mindset shift – an idea that only requires you to think differently about a problem or something you want, that unlocks your potential in an instant – even if true change takes time. I also love pickles.

That’s what makes this quote from Wayne Dyer perfectly pertinent to quick pickling. Contrary to popular belief, pickling isn’t just for cucumbers! You can turn many vegetables from the spring garden into crisp, tangy snacks such as turnips and radishes. Quick pickles make a fun addition to salads, sandwiches, tacos, and more.

Unlike traditional canning, quick pickles are as fast and easy to make as boiling water and pouring it over a few ingredients in a glass jar. For best results, use the freshest vegetables. Keep reading to learn what herbs and spices you can add to enhance your veggies’ flavor! Soon you’ll have delicious snacks to share with friends and family.


Pickled cucumbers in a glass jar

Quick Pickle Recipe

Founder
Unlike traditional canning, quick pickles are as fast and easy to make as boiling water and pouring it over a few ingredients in a glass jar.
Prep Time 10 minutes
Cook Time 0 minutes
Resting Time 1 day
Total Time 1 day 10 minutes
Course Side Dish, Snack

Equipment

  • 1 quart mason jar (or any heat-proof container that you can pour boiling water into)

Ingredients
  

Pickling Ingredients

  • 1 pound fresh vegetables (sliced)
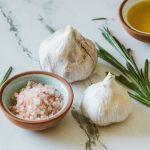
  • 2 cloves garlic (smashed)
  • 2 tsp whole peppercorns (you can also use coriander and/or mustard seeds)
  • 1-2 sprigs fresh herbs (e.g. thyme, dill, and or/rosemary)

Brine Ingredients

  • 1 cup vinegar (white, apple cider, or rice vinegar)
  • 1 cup water
  • 1 Tbsp kosher salt
  • 1 Tbsp sugar

Instructions
 

  • Wash jar(s) with soap and hot water and let dry.
  • Thinly slice fresh vegetables into bite-sized pieces. Smash 2 cloves of garlic with the flat side of a knife, or the clean heel of your hand.
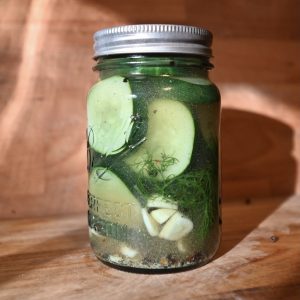
  • Pack vegetables, garlic, spices, and herbs into a mason jar, leaving at least 1/2” of "breathing room" at the top.
  • Put the brine ingredients in a saucepan over medium heat. Stir to dissolve ingredients, and bring to a boil.
  • Pour the hot brine into the jar(s), still leaving at least 1/2” room at the top.
  • Tap the side of the jar(s) to remove any air bubbles.
  • Let the jar(s) cool to room temperature before refrigerating. Wait 24-48 hours before eating for the best flavor.

Notes

Depending on how carefully these quick pickles are prepared and stored, they may last up to 2 months in the refrigerator. They are not fully preserved, however, and so they cannot be stored unrefrigerated or stored indefinitely.