Spinach and Feta Borek

Photo of baked dish being pulled from oven

Experience the savory delight of our spinach and feta borek, a timeless Mediterranean treat. Layers of delicate phyllo pastry encase a flavorful filling of spinach and creamy feta cheese, creating a harmonious blend of textures and tastes. With each bite, savor the richness of the cheese and the earthy freshness of the spinach, making this dish a true delight for the senses. Whether enjoyed as a hearty appetizer or a satisfying main course, our borek is sure to transport you to the sun-kissed shores of the Mediterranean with its delicious flavors.

Photo of baked dish being pulled from oven

Spinach and Feta Borek

David Tanis
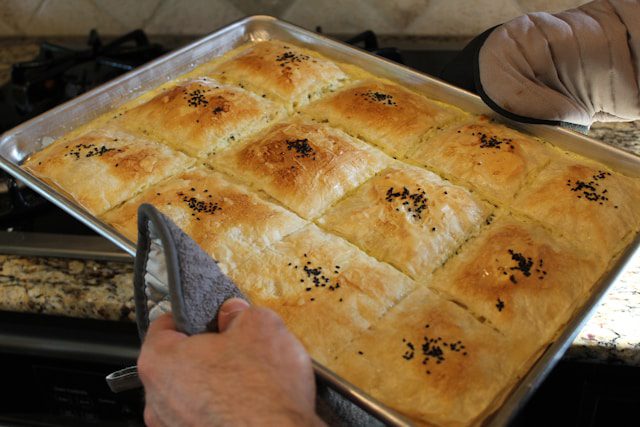
Indulge in the savory delight of spinach and feta borek, a traditional Turkish pastry featuring layers of flaky phyllo dough filled with a sumptuous blend of spinach, tangy feta cheese, and fragrant herbs, perfect for adding a Mediterranean twist to your springtime gatherings. This crispy, golden pastry offers a delightful fusion of flavors and textures, making it a deliciously satisfying addition to any seasonal spread.
Prep Time 15 minutes
Cook Time 30 minutes
Course Side Dish
Servings 8 servings

Ingredients
  

  • 1 lb baby spinach or other cooking greens sliced into 1/2" ribbons
  • 1 cup chopped parsley (from 1 small bunch)
  • 1 cup chopped fresh dill (from 1 small bunch)
  • 6 scallions, thinly sliced (about 3/4 cup)
  • 1 tsp dried oregano
  • 4 eggs beaten
  • Kosher salt and black pepper
  • 1/2 tsp Maras pepper or regular red pepper flakes
  • 8 oz crumbled feta (about 2 cups)
  • 4 oz grated Manchego or other sheep's milk cheese (1 cup)
  • 1/2 cup extra-virgin olive oil plus more as needed
  • 6 sheets phyllo dough

Instructions
 

  • Heat oven to 350° F. Make the filling: in a large bowl, combine spinach, parsley, dill, scallions, oregano and eggs and stir to incorporate. Season with salt and pepper, then add Maras pepper, feta and Manchego, and stir well.
  • Brush a 10-inch pie plate or skillet lightly with olive oil. (You can also use a 9x13" pan for a rectangular pie.) Line with 1 sheet of phyllo, letting the excess fall over the sides of the pan. Brush phyllo lightly with olive oil, then follow with 2 more sheets, brushing each with oil.
  • Pour the filling into the phyllo-lined pan, spreading it to the edges with the back of a spoon. Top with 3 more sheets of phyllo, brushing each sheet with olive oil before adding the next.
  • Fold the ends of the phyllo back over the top and towards the center of the borek, and brush with oil. With the palm of your hand, press down on the top layer to make the pie compact. (Alternatively, roll the excess toward the center to form a rim.)
  • Bake for 30 minutes, until golden. Let rest for a few minutes before cutting into wedges. The borek is also good served at room temperature.

Notes

This recipe was originally published by David Tanis for the NYT cooking blog.
This favorite recipe was contributed by a Backyard Eats client! She encourages home cooks to substitute ingredients as needed based their lifestyle or what's growing fresh in their garden.

Pea, Asparagus, and Fava Bean Salad

Photo of salad with asparagus from Carly Jayne from Unsplash

Indulge in the refreshing flavors of our minty pea soup, a perfect blend of vibrant green peas and aromatic mint. Each spoonful is a celebration of spring’s bounty, with the sweetness of peas perfectly complemented by the cool freshness of mint. Whether enjoyed as a light starter or a comforting meal, this soup offers a delightful burst of flavor that will leave you feeling nourished and invigorated.

Photo of salad with asparagus from Carly Jayne from Unsplash

Pea, Asparagus, and Fava Bean Salad

Bon Appetit
Savor the vibrant flavors of spring with a refreshing Pea, Asparagus, and Fava Bean Salad, bursting with seasonal goodness. This crisp and verdant salad combines tender asparagus spears, sweet peas, and creamy fava beans, tossed in a zesty lemon vinaigrette, creating a delightful harmony of flavors and textures that celebrates the freshness of the season.
Course Salad

Ingredients
  

  • 3 Tbsp extra-virgin olive oil
  • 1 Tbsp finely grated Pecorino or Parmesan
  • 1 Tbsp fresh lemon juice or more
  • Kosher salt and freshly ground pepper
  • 2 cups fresh fava beans (from about 2 lb pods) or frozen fava beans, thawed
  • 2 bunches asparagus trimmed, stalks peeled if thick
  • 1 cup shelled fresh peas (from about 1 lb pods) or frozen peas, thawed
  • 1/2 cup vegetable oil
  • 1 shallot thinly sliced
  • 4 slices bacon cooked and crumbled

Instructions
 

  • Whisk olive oil, Pecorino, and 1 Tbsp lemon juice in a medium bowl to blend. Season with salt, pepper, and more lemon juice, if desired. Set dressing aside.
  • If using fresh fava beans, cook in a large saucepan of boiling salted water until tender, about 4 minutes. Using a slotted spoon, transfer to a colander set in a bowl of ice water (do not cook frozen beans). Drain and peel; place in a large bowl.
  • Return water in saucepan to a boil; add asparagus and cook until just tender, about 4 minutes. Using tongs, transfer to colander in ice water.
  • If using fresh peas, return water in saucepan to a boil; add peas and cook until tender, about 3 minutes (do not cook frozen peas). Drain; transfer to colander in ice water. Drain vegetables. Add to bowl with fava beans.
  • Combine vegetable oil and shallot in a small saucepan over medium heat and cook, stirring occasionally, until shallot is golden brown and crispy, 10-12 minutes. Transfer shallot to a paper towel-lined plate.
  • Add dressing to bowl with vegetables, season with salt and pepper, and toss to coat. Transfer salad to a serving platter and top with shallot and bacon.

Notes

Note: Dressing and vegetables can be prepared 1 day ahead. Cover separately and chill.
This recipe was originally published in the April 2013 issue of Bon Appetit.
This favorite recipe was contributed by a Backyard Eats client! She encourages home cooks to substitute ingredients as needed based their lifestyle or what's growing fresh in their garden.

Minty Pea Soup

Photo of soup from Megan Bucknall from Unsplash

Indulge in the refreshing flavors of our minty pea soup, a perfect blend of vibrant green peas and aromatic mint. Each spoonful is a celebration of spring’s bounty, with the sweetness of peas perfectly complemented by the cool freshness of mint. Whether enjoyed as a light starter or a comforting meal, this soup offers a delightful burst of flavor that will leave you feeling nourished and invigorated.

Photo of soup from Megan Bucknall from Unsplash

Minty Pea Soup

Bon Appetit
Elevate your springtime menu with a refreshing Minty Pea Soup, a vibrant blend of tender peas and fresh mint, delicately seasoned to perfection. This light and flavorful soup offers a burst of green goodness, perfect for welcoming the season's bounty with every spoonful.
Course Soup

Ingredients
  

  • 3 Tbsp unsalted butter
  • 1 medium onion chopped
  • 4 cups low-sodium vegetable broth divided
  • 6 cups shelled fresh peas (from about 6 lb pods) or frozen peas, thawed
  • 1/4 cup fresh flat-leaf parsley leaves
  • 1/4 cup fresh mint leaves
  • Kosher salt and freshly ground black pepper
  • 1/4 cup creme fraiche or sour cream
  • 2 Tbsp heavy cream or water
  • Chopped fresh chives for serving

Instructions
 

  • Melt butter in a large heavy pot over medium heat. Add onion and cook, stirring often, until softened but not browned. 6-8 minutes.
  • Add 2 cups broth and bring to a boil. Add peas, reduce heat, and simmer gently until tender, about 5 minutes for fresh peas, about 2 minutes for frozen.
  • Remove pot from heat. Add parsley, mint, and remaining 2 cups broth to pot. Purée soup in a blender or with an immersion blender, thinning with water if soup is too thick, until smooth. Season soup with salt and pepper.
  • Whisk creme fraiche and cream in a small bowl to blend. Serve warm soup topped with chives, passing creme fraiche mixture alongside for spooning over.

Notes

This recipe was originally published in the April 2013 issue of Bon Appetit.
This favorite recipe was contributed by a Backyard Eats client! She encourages home cooks to substitute ingredients as needed based their lifestyle or what's growing fresh in their garden.

Spicy Stir-Fried Tatsoi

Photo of baby bok choy from Chanwei from Unsplash

Kick up the heat with our spicy stir-fried tatsoi, a flavorful twist on a classic dish. The tender tatsoi leaves absorb the bold spices and aromatics, creating a mouthwatering symphony of flavors with each bite. Whether served as a zesty side or a hearty main course, this dish is sure to excite your taste buds and add a delicious kick to your meal.

Photo of baby bok choy from Chanwei from Unsplash

Spicy Stir-Fried Tatsoi

Add some zing to your spring meals with Spicy Stir-Fried Tatsoi, a tantalizing dish featuring tender tatsoi greens stir-fried to perfection with a fiery blend of spices. This vibrant and nutritious dish offers a delightful kick, making it a flavorful addition to any seasonal spread.
Prep Time 15 minutes
Course Salad
Servings 4 servings

Ingredients
  

  • 2 Tbsp olive oil
  • 1/2 tsp whole cumin seeds
  • 1 tsp freshly diced fresh ginger
  • 1 small clove garlic sliced
  • 1 Serrano pepper seeds removed, pepper finely diced
  • 1 medium shallot thinly sliced
  • 4-6 small carrots julienned
  • 1/2 lemon juice and zest of, juice divided
  • 1 small head of tatsoi leaves and stems
  • 2 Tbsp shredded basil leaves
  • Sea salt
  • Water as needed

Instructions
 

  • Heat the oil in a wok over a medium high flare. Add the cumin, and let sizzle for 30 seconds or until the cumin darkens. Add the ginger, garlic and Serrano chili. Cook stirring until garlic starts to color. Add shallots cook stirring 2-3 minutes.
  • Add the carrots. Sprinkle with salt. Stir-fry for 2-3 minutes. Add lemon zest and 1/2 the lemon juice. When it evaporates add 2 Tbsp water. Cook stirring over high heat until the water has almost gone and the carrots have softened, about 5 minutes.
  • Add the tatsoi. Mix into the veggies. Stir-fry for about 2 minutes, then add another tablespoon of water. This will create steam. Cover the wok and lower heat to medium. Cook 1-2 minutes or until the tatsoi stems begin to soften.
  • Remove the lid, raise the heat to medium, and stir-fry until any liquid has evaporated. Add the remaining lemon juice and the basil leaves. Cook 1 minute. Serve immediately.

Notes

This recipe was originally published by the Cook For Your Life blog.
This favorite recipe was contributed by a Backyard Eats client! She encourages home cooks to substitute ingredients as needed based their lifestyle or what's growing fresh in their garden.

Tatsoi Asian Greens Salad

Photo of chopped bok choy and broccoli from Mor Shani from Unsplash

Enjoy the crisp freshness of tatsoi Asian greens in our vibrant salad. These tender leaves offer a delicate yet satisfying crunch, perfectly embodying the essence of spring. With every bite, savor the natural flavors of the greens, making this salad a refreshing and nutritious addition to any meal or a delightful standalone dish.

Photo of chopped bok choy and broccoli from Mor Shani from Unsplash

Tatsoi Asian Greens Salad Recipe

ChihYu Smith
Enjoy the crisp freshness of spring with a Tatsoi Asian Greens Salad, featuring vibrant tatsoi greens tossed with a medley of Asian-inspired flavors and textures. This light and nutritious salad combines the delicate crunch of tatsoi with the boldness of ranch dressing, creating a refreshing dish that celebrates the essence of the season.
Prep Time 15 minutes
Course Salad
Servings 6 people

Ingredients
  

Whole30 Ranch Yogurt Dressing

  • 3 Tbsp mayo
  • 1 Tbsp dairy-free milk unsweetened
  • 3 Tbsp coconut yogurt or dairy-free yogurt thick texture, unsweetened
  • 1 Tbsp coconut aminos
  • Coarse sea salt and black pepper to taste

Tatsoi Salad

  • 7 oz carrots about 2 large
  • 7 oz English cucumber or mini cucumbers
  • 2.5 oz tatsoi or baby spinach
  • 2 oz mizuna or baby arugula
  • 2 oz mixed greens of choice
  • 1 Tbsp olive oil
  • Furikake or toasted sesame seeds, optional
  • Coarse sea salt to taste or Takii Umami mushroom powder to replace salt

Instructions
 

  • Mix Whole30 ranch yogurt dressing. Set it aside in the fridge until ready to use.
  • Use a vegetable peeler to shave the carrots and cucumber into ribbons.
  • Add the carrot and cucumber ribbons to a large salad bowl with tatsoi, mizuna, and more mixed baby greens.
  • Drizzle with olive oil and the salad dressing. Start with 3 Tbsp dressing at first and add more, if desired. Sprinkle with furikake, if using. Toss and season with salt to taste.
  • Serve cold and enjoy right away.

Notes

This recipe is originally by ChihYu Smith of the I Heart Umami blog.
This favorite recipe was contributed by a Backyard Eats client! She encourages home cooks to substitute ingredients as needed based their lifestyle or what's growing fresh in their garden.

Tatsoi Salad with Sesame-Ginger Dressing

Photo of tofu stir fry from Cristi Ursea from Unsplash

“Toss crisp tatsoi leaves in our tantalizing sesame-ginger dressing for a salad that bursts with vibrant flavors and textures. The delicate bitterness of tatsoi perfectly complements the bold and zesty notes of our homemade dressing, creating a harmonious marriage of tastes. With each refreshing bite, this salad offers a delightful journey of freshness and depth, making it a perfect addition to any meal or a standalone delight.

Photo of tofu stir fry from Cristi Ursea from Unsplash

Tatsoi Salad with Sesame-Ginger Dressing

Kalyns Kitchen
Savor the essence of spring with a Tatsoi Salad drizzled in Sesame Ginger Dressing, where tender tatsoi greens are beautifully complemented by the aromatic blend of sesame and ginger. This refreshing salad offers a perfect harmony of flavors, making it a delightful addition to your seasonal menu.
Prep Time 15 minutes
Cook Time 1 minute
Additional Time 1 hour
Course Salad
Servings 2 servings

Ingredients
  

  • 12 oz Tatsoi leaves
  • 1 Tbsp sesame seeds for garnish
  • 2 Tbsp soy sauce
  • 1 Tbsp rice vinegar
  • 1 tsp grated ginger root
  • 1 tsp Golden Monkfruit Sweetener (see notes)
  • 1/2 tsp sriracha sauce
  • Freshly ground black pepper to taste

Instructions
 

  • Bring a large pot of salted water to a boil. Fill another bowl with cold water and a handful of ice cubes.
  • Wash Tatsoi leaves and cut into thick strips. You can use a salad spinner to rinse.
  • Dump Tatsoi into boiling water, tine for exactly one minute, then drain immediately into a colander and dump into bowl with ice water.
  • While Tatsoi is cooling in ice water, get a plastic bowl with a tight-fitting lid that's large enough to hold all the Tatsoi.
  • Mix dressing ingredients in this bowl, then drain Tatsoi well and add to dressing.
  • Chill in the refrigerator an hour or more, turning bowl over a few times so Tatsoi remains coated with the dressing.
  • To serve, use tongs or a slotted spoon to remove Tatsoi from bowl and arrange on serving plates.
  • Toast sesame seeds for 1-2 minutes in a dry pan and sprinkle over salad. (If using a mixture of sesame seeds, the black ones burn more quickly than the white ones.)
  • Serve immediately. This salad is best freshly made.

Notes

Notes:
I used a mix of black and white sesame seeds, but you can use whichever type you have. Use Gluten-Free Soy Sauce if needed. Instead of monkfruit sweetener, you can use any sweetener you prefer.
This recipe is from Kalyn's Kitchen food blog, who adapted it from Big Oven, who adapted it from the New York Times.
This favorite recipe was contributed by a Backyard Eats client! She encourages home cooks to substitute ingredients as needed based their lifestyle or what's growing fresh in their garden.

Butternut Squash with Homemade Harissa

Photo of cut butternut squash on a baking sheet from Sara Dubler from Unsplash

Roasted to perfection, our butternut squash pairs exquisitely with our homemade harissa sauce, infusing each bite with a balance of smoky, spicy, and sweet flavors. This culinary masterpiece captures the essence of autumn, bringing warmth and depth to your table with its rich and aromatic profile. Whether served as a hearty side dish or a flavorful main course, our butternut squash with homemade harissa is sure to tantalize your taste buds and leave you craving more.

Photo of cut butternut squash on a baking sheet from Sara Dubler from Unsplash

Butternut Squash with Homemade Harissa

Food and Wine
Elevate your seasonal dining experience with Butternut Squash infused with Homemade Harissa, where tender squash is coated in a fiery homemade harissa sauce for a burst of bold flavors. This delectable dish offers a tantalizing combination of sweet and spicy, perfect for warming up your taste buds during the cooler months.
Prep Time 25 minutes
Cook Time 1 hour 20 minutes
Course Side Dish
Servings 6 servings

Ingredients
  

  • 3 garlic cloves thinly sliced
  • Kosher salt to taste
  • 1 Tbsp tomato paste
  • 1 tsp freshly squeezed lemon juice
  • 1 Tbsp ancho chile powder
  • 1 Tbsp smoked paprika
  • 1/4 tsp cayenne pepper
  • 1/4 tsp ground cumin
  • 1/4 tsp caraway seeds ground in a spice grinder
  • 1/2 cup extra-virgin olive oil divided
  • 1.5 lb butternut squash peeled, seeded, and cut into 1.5" chunks
  • 2 Tbsp water
  • Freshly ground black pepper

Instructions
 

  • Preheat the oven to 375°F. On a work surface, using the flat side of a chef's knife, mash the whole garlic clove to a paste with a pinch of salt.
  • Scrape the garlic paste into a small bowl and stir in the tomato paste and fresh lemon juice. Add the ancho chile powder, smoked paprika, cayenne, cumin and caraway. Gradually stir in 1/4 cup plus 2 Tbsp of the olive oil and season the harissa with salt.
  • In a bowl, toss the butternut squash and sliced garlic with 2 Tbsp of harissa, the remaining 2 Tbsp of olive oil, water, salt, and pepper.
  • Spread the squash in a single layer in an 8-inch square baking dish. Roast in the center of the oven for 1 hour and 15 minutes, or until the squash is tender and browned in spots.

Notes

Note: The roasted squash can be refrigerated overnight. Re-warm in a 350°F oven before serving.
This recipe was originally published by Food and Wine.
This favorite recipe was contributed by a Backyard Eats client! She encourages home cooks to substitute ingredients as needed based their lifestyle or what's growing fresh in their garden.

Summer Squash Gratin

Photo of scalloped vegetable from Angela Sciortino from Unsplash

Embrace the flavors of summer with our squash gratin. This delightful dish features tender summer squash, layered with creamy goodness and baked to perfection. Whether served as a side dish or a light meal, it’s a delicious way to savor the season’s bounty. With every bite, our summer squash gratin brings a taste of summer to your table, capturing the essence of the season in every cheesy, crispy mouthful.

Photo of scalloped vegetable from Angela Sciortino from Unsplash

Summer Squash Gratin

Laura Rege
Celebrate the flavors of summer with a delightful Summer Squash Gratin, featuring tender slices of summer squash baked to golden perfection. This comforting dish showcases the bounty of the season in a satisfying and indulgent way, making it a perfect addition to any summer gathering.
Prep Time 1 hour
Cook Time 30 minutes
Course Side Dish
Servings 4

Ingredients
  

  • 1/4 cup extra-virgin olive oil
  • 3 small leeks (1/2 lb) white and tender green parts thinly sliced into rounds
  • 1/4 cup dry white wine
  • 3 medium zucchini cut lengthwise into 1/8"-thick slices, preferably on a mandolin
  • Kosher salt and pepper to taste
  • 1 cup finely shredded Gruyere cheese (2 oz)
  • 1 plum tomato very thinly sliced crosswise
  • Flaky sea salt and crusty bread for serving

Instructions
 

  • Preheat the oven to 425°F. In a large skillet, heat 1 tablespoon of oil over moderately high heat. Add the leeks and cook, stirring occasionally, until softened: about 3 minutes.
  • Add the wine and cook until evaporated: about 2 minutes. Spread leeks in a 9-inch round baking dish.
  • Meanwhile, on 2 large baking sheets, spread the zucchini and yellow squash and brush with the remaining 3 tablespoons of oil; season with salt and pepper. Sprinkle with the cheese and let sit until slightly softened: about 5 minutes.
  • Tightly roll 1 piece of zucchini and set it on the leeks in the center of the dish. Working outward from that center slice, continue rolling and coiling additional pieces of zucchini and yellow squash until you reach the edge of the baking dish.
  • Season the tomato slices with salt and pepper, then tuck them in intervals between the zucchini and squash. Scrape any cheese off of the baking sheets and sprinkle on top.
  • Bake for 30 minutes, until the zucchini and squash are tender and browned in spots. Sprinkle with sea salt. Let cool slightly, then serve with crusty bread.

Notes

This recipe is originally from the July 2027 issue of Food and Wine. Recipe by Laura Rege.
This favorite recipe was contributed by a Backyard Eats client! She encourages home cooks to substitute ingredients as needed based their lifestyle or what's growing fresh in their garden.

Apple Baked Squash

Photo of baked apples filled with nuts and sugar from Liia from Unsplash

Savor the flavors of autumn with our apple baked squash. This delightful dish features tender squash filled with sweet and tangy apples, perfectly complementing the season’s bounty. Baked to perfection, it’s a comforting and wholesome meal that captures the essence of fall. Whether enjoyed as a side dish or a hearty main course, our apple baked squash brings warmth and flavor to your table, making every bite a celebration of the harvest season.

Photo of baked apples filled with nuts and sugar from Liia from Unsplash

Apple Baked Squash

NY Times Magazine
Delight in the essence of autumn with Apple Baked Squash, where tender squash halves are filled with a sweet and fragrant apple mixture, baked to caramelized perfection. This comforting dish encapsulates the warmth and flavors of the season, offering a delightful fusion of sweet and savory notes with every bite.
Prep Time 30 minutes
Cook Time 1 hour 30 minutes
Course Side Dish
Servings 4 servings

Ingredients
  

  • 2 acorn squash (halved crosswise, seeds and fibers scooped out)
  • 2 small McIntosh apples (halved, cored, and cut into 1/4-inch thick slickes)
  • 4 tsp unsalted butter
  • 3 cups apple cider

Instructions
 

  • Slice off the bottom of each squash half so that they stand flat, being careful to not cut into the flesh. Place in a medium-size roasting pan.
  • Fan half of an apple in the cavity of each squash half. Add 1 tsp of butter and 1/4 cup of cider to each.
  • Pour the remaining cider in the roasting pan. Cover the squash loosely with aluminum foil. Roast until the squash is tender, about 1.5 hours.
  • Place 1 squash half on each of 4 plates and serve immediately.

Notes

This recipe was published in the November 16, 1994 edition of NY Times Magazine. (pp 71-72)
This favorite recipe was contributed by a Backyard Eats client! She encourages home cooks to substitute ingredients as needed based their lifestyle or what's growing fresh in their garden.

Blue Hubbard Pie with Maple Syrup

A photo of a slice of pumpkin pie from Element5 Digital from Unsplash

Indulge in the taste of autumn with our blue hubbard pie drizzled with maple syrup. Blue hubbard is a flavorful winter squash, perfect for this seasonal dessert. Baked into a golden crust and finished with rich maple syrup, it embodies the warmth of fall. Enjoy it as a comforting finale or with a cup of tea on a crisp evening, capturing the essence of the harvest season in every bite.

A photo of a slice of pumpkin pie from Element5 Digital from Unsplash

Blue Hubbard Pie with Maple Syrup

NY Times Magazine
Delight in a Blue Hubbard pie adorned with maple syrup, a delectable creation from your garden's harvest. Revel in the sweet embrace of autumn's finest flavors.
Prep Time 1 hour 20 minutes
Cook Time 1 hour
Total Time 2 hours 20 minutes
Course Dessert

Ingredients
  

The Crust

  • 1.25 cups all-purpose flour
  • 1 tsp sugar
  • 4 Tbsp cold, unsalted butter (cut into small pieces)
  • 3 Tbsp cold vegetable shortening
  • 3 Tbsp ice water

The Filling

  • 1.5 cups Blue Hubbard baked squash puree (see notes)
  • 4 eggs, lightly beaten
  • 3/4 cup pure maple syrup
  • 1/2 cup half-and-half
  • 1/2 tsp salt
  • 1 tsp ground cinnamon
  • 1/2 tsp ground nutmeg

Instructions
 

The Crust

  • To make the crust, combine the flour, salt and sugar in a medium-size bowl. Rub in the butter and the shortening until the mixture resembles coarse meal.
  • Gradually stir in the ice water, being careful not to overwork the dough.
  • Form into a ball, flatten into a disk and wrap in plastic. Chill for 1 hour.
  • After chilling, preheat oven to 400 degrees. Roll out the dough and fit it into a 9-inch pie shell.

The Filling

  • To make the filling, whisk all ingredients together until smooth. Scrape into the pie shell and bake for 10 minutes.
  • Reduce the heat to 325 degrees and continue baking until the filling is set, about 50 minutes.
  • Cool. Top with whipped cream sweetened with maple syrup.

Notes

Note: to make the puree, halve and clean the squash and cut into 6-inch pieces. Roast at 400 degrees for about 1 hour. Scoop the flesh from the skin, drain the liquid and pulse in a food processor. One 10-pound squash yields 8 cups of puree.
This recipe was published in the November 16, 1994 edition of NY Times Magazine. (pp 71-72)
This favorite recipe was contributed by a Backyard Eats client! She encourages home cooks to substitute ingredients as needed based their lifestyle or what's growing fresh in their garden.